This guide offers a detailed step-by-step breakdown to help you navigate the platform, from accessing bio pages and choosing your starting point to adjusting settings and editing content blocks.
Whether you're starting from scratch or using one of the available templates, this guide ensures you can create a professional and engaging bio page tailored to your needs.
Step 1: Accessing Bio Pages
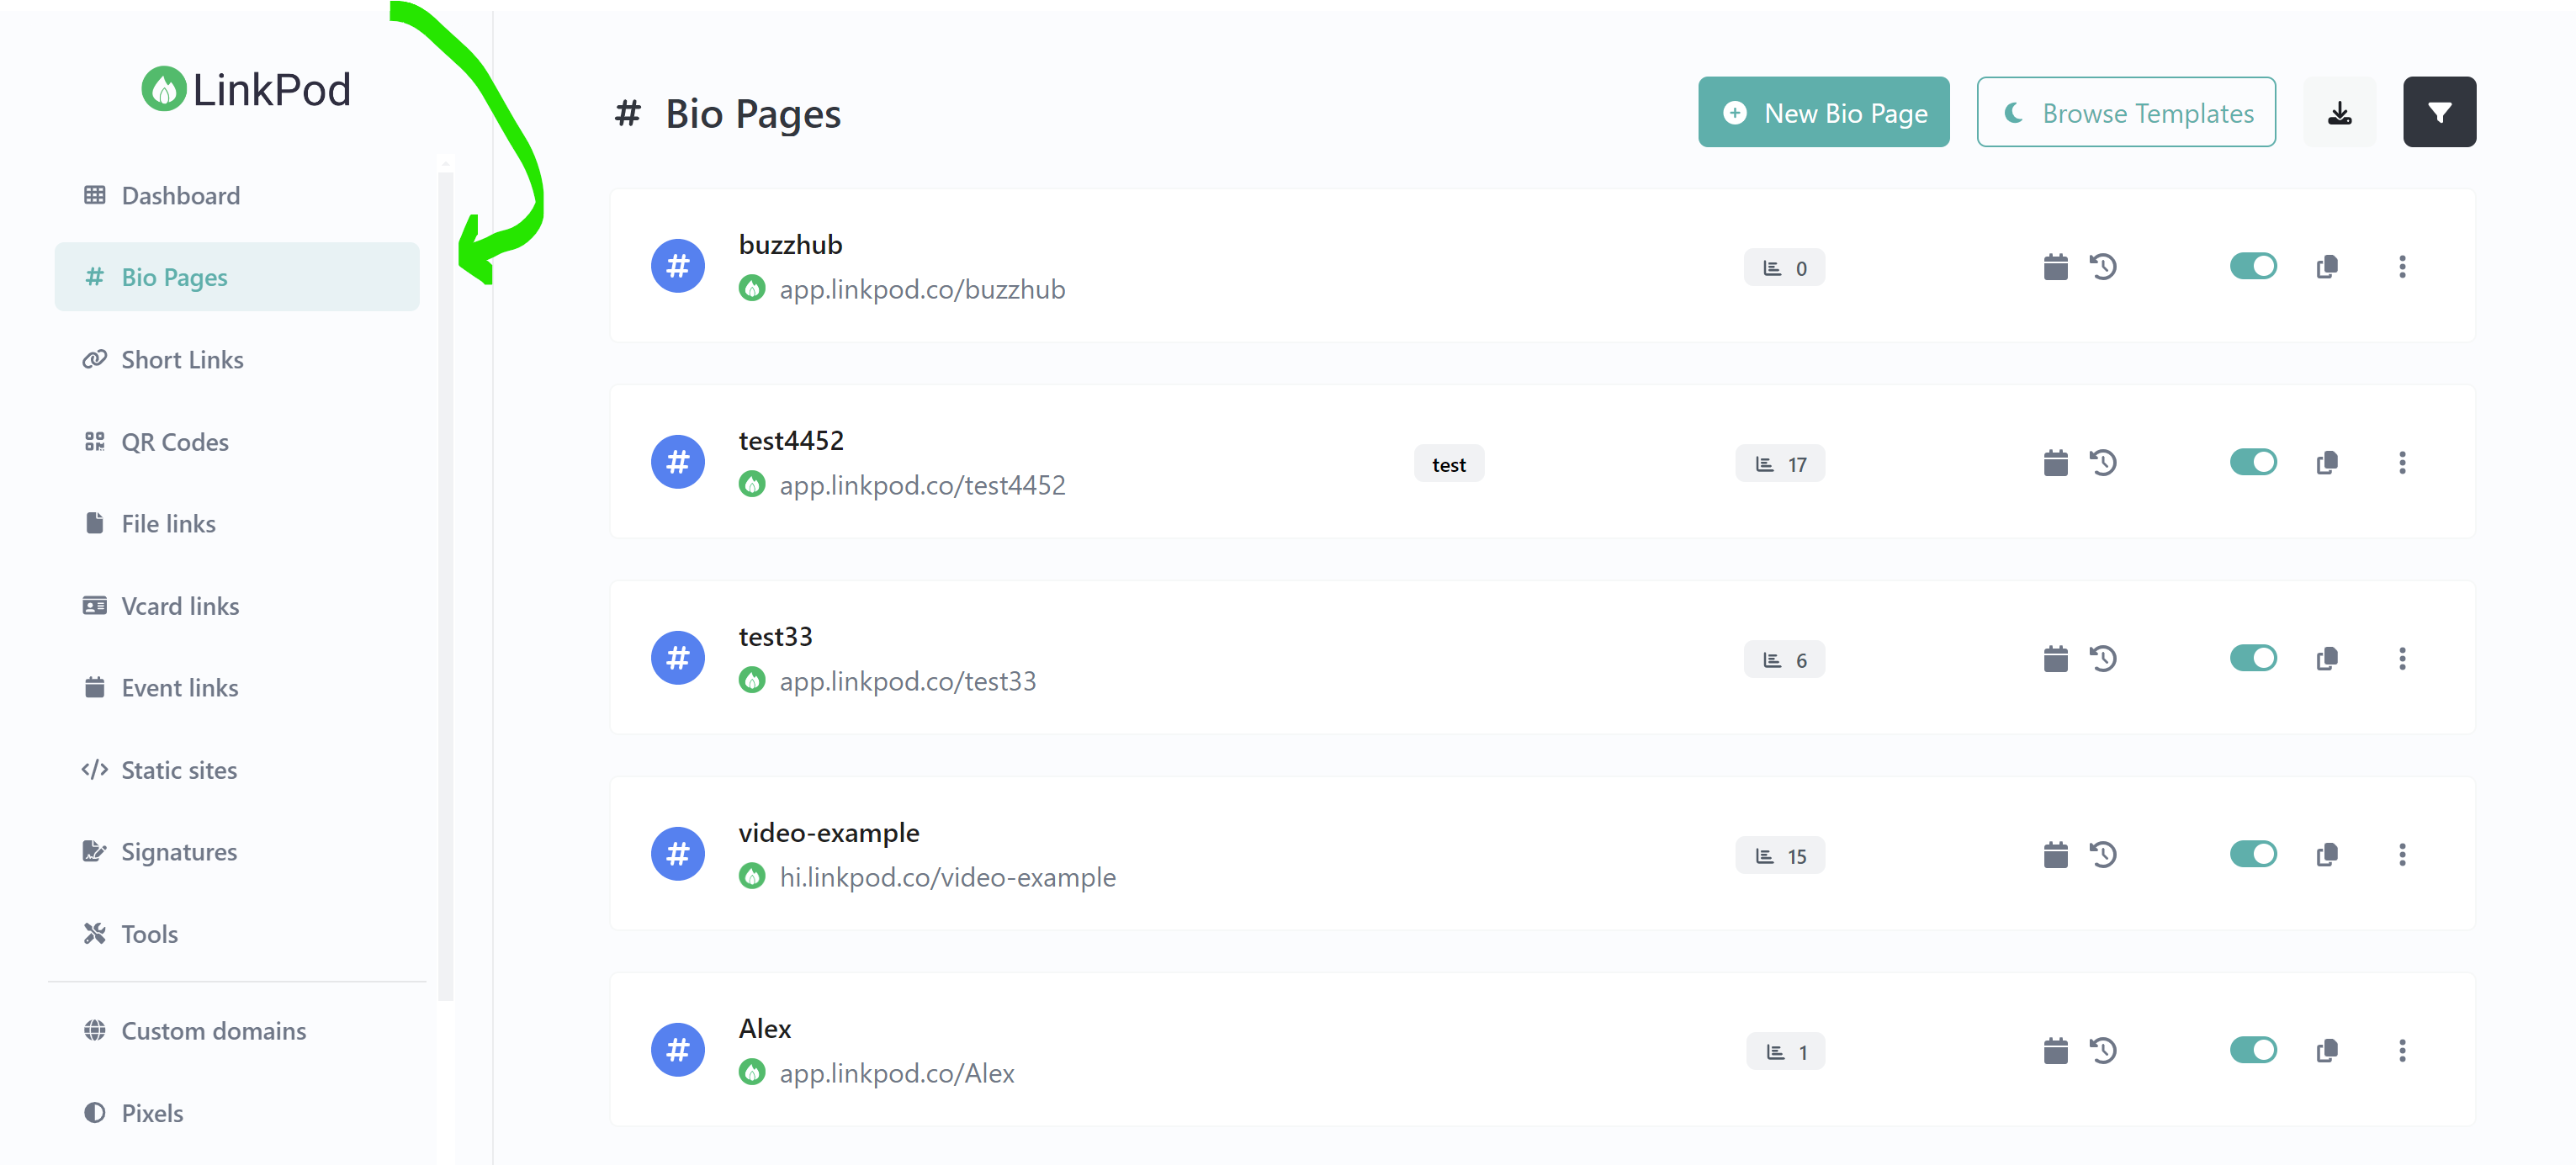
Navigate to Bio Pages: Start by locating the bio pages option in the left-hand menu of the LinkPod platform. This section is your starting point for creating a new link in bio page.

Step 2: Choosing Your Starting Point
Create From Scratch or Use Templates: You have two choices here. You can start building your bio link from scratch by clicking the "New Bio Page" button located in the top right corner. Alternatively, for a quicker setup, you can choose one of the bio link templates by clicking the "Browse Templates" button, also in the top right.

Selecting a Template: LinkPod offers a variety of templates, with new ones being added regularly. Scroll through the available options and select one that aligns with your brand or personal style. For this example, we're selecting the "Octavian" template.
Customizing Your URL: Once you've chosen a template, you will be prompted to give your page a unique URL. This can be changed later if needed.
Step 3: Adjusting Page Settings
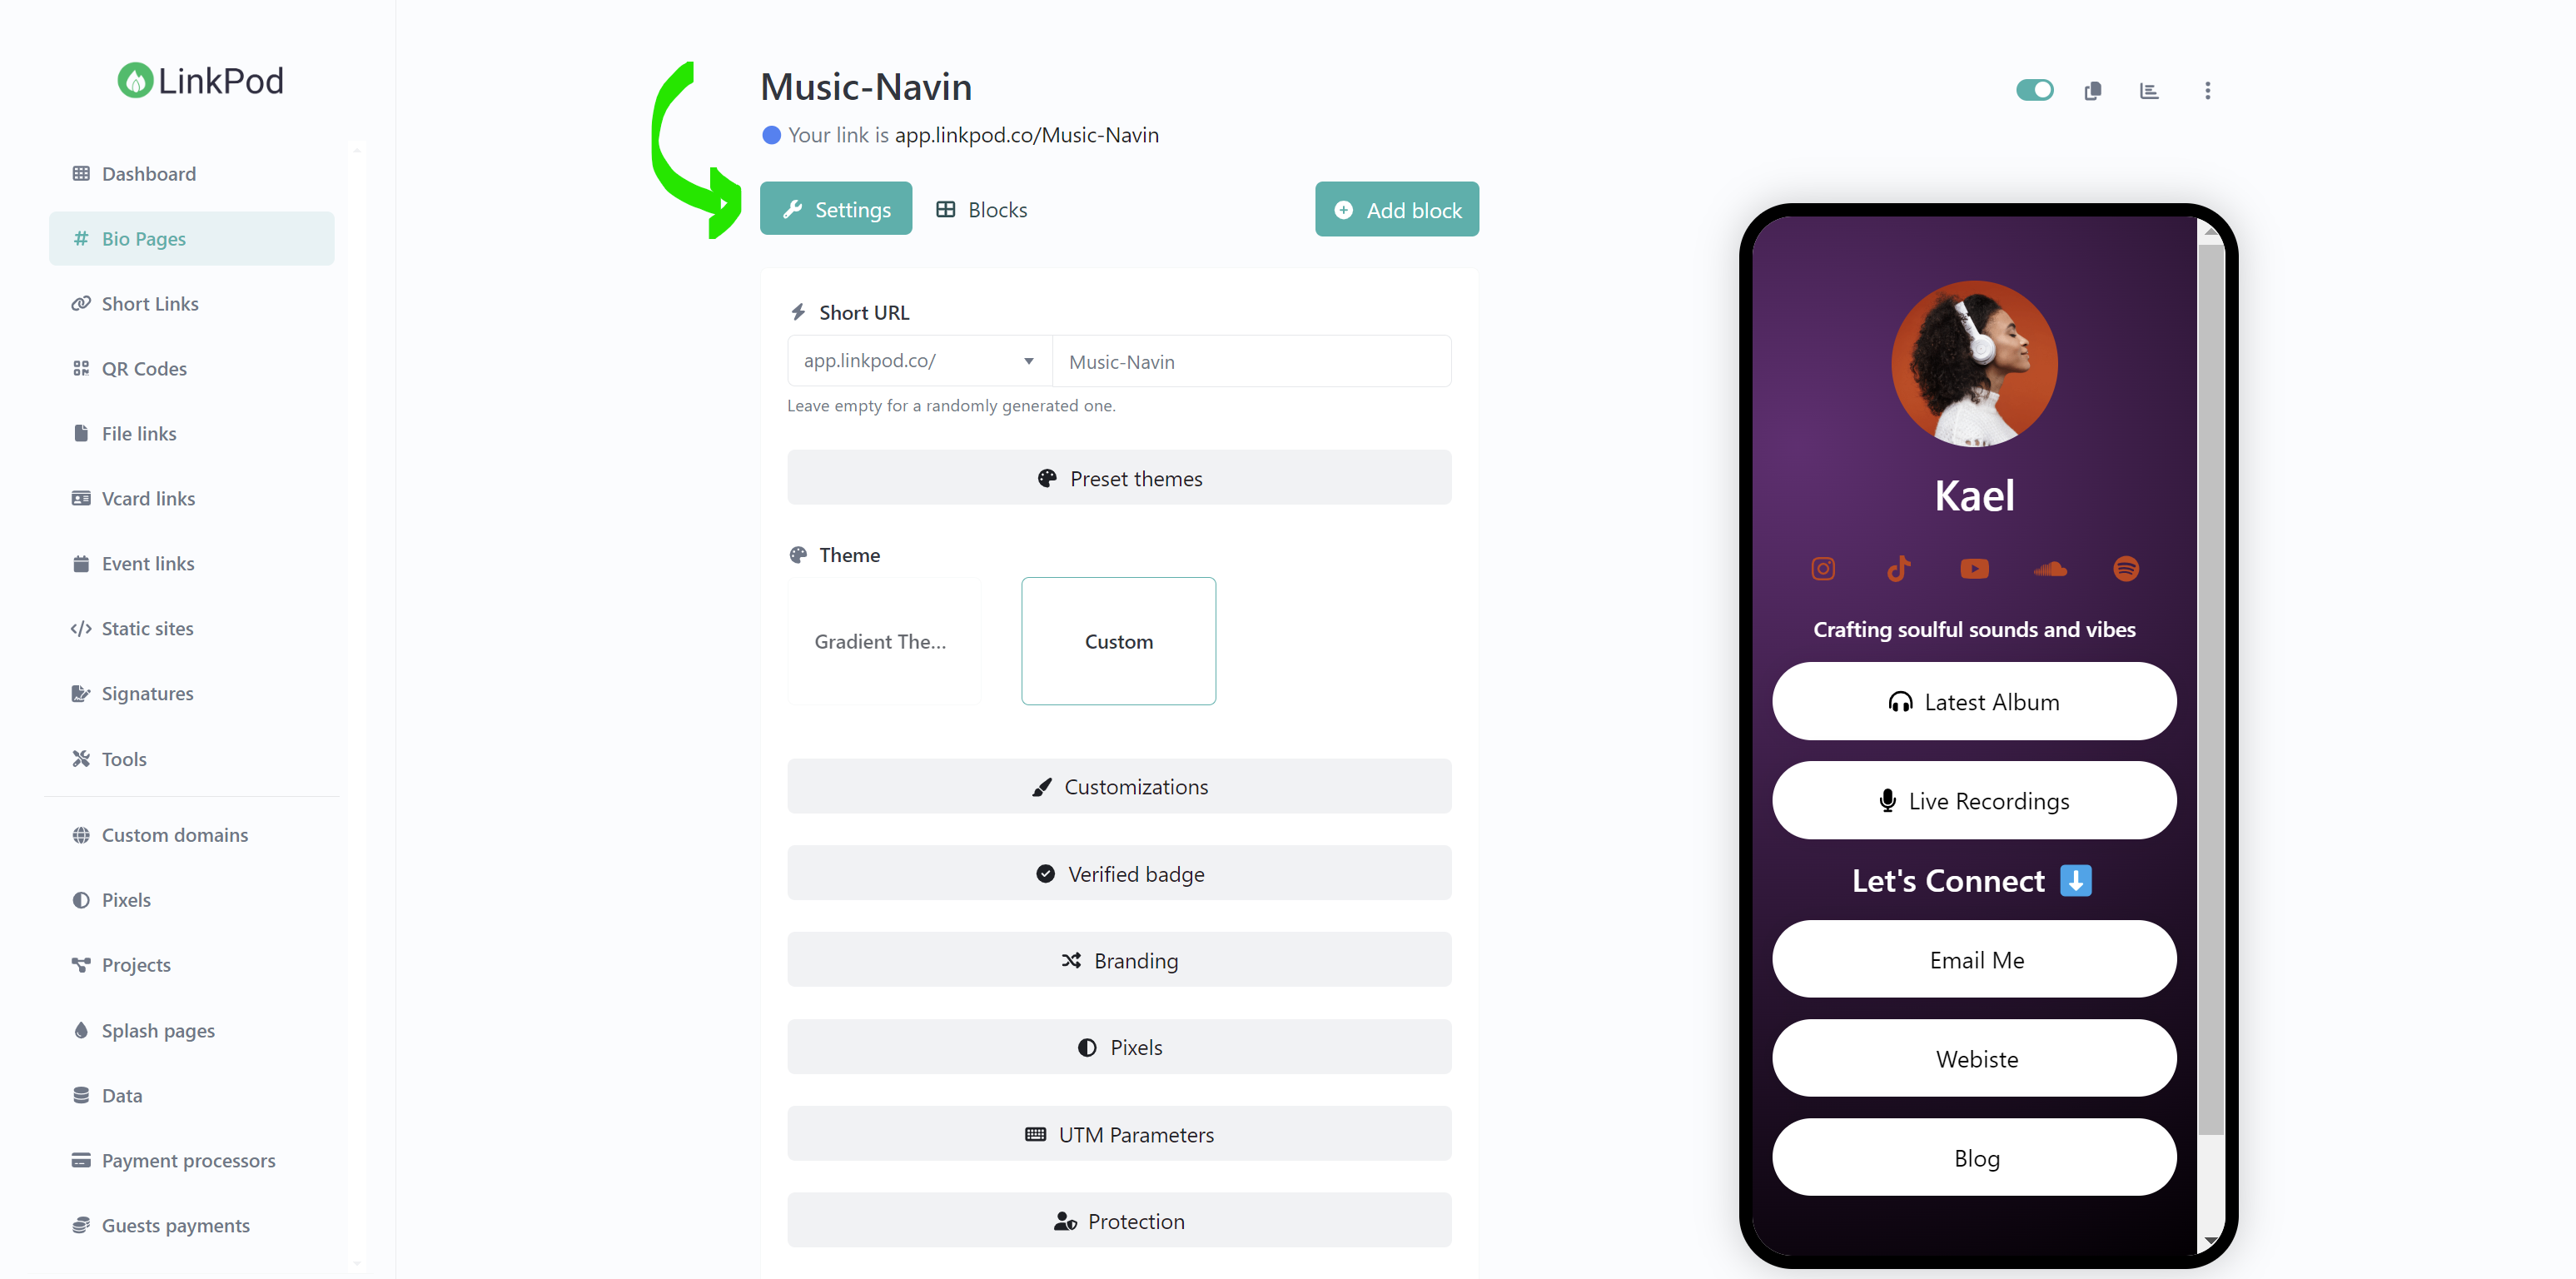
After creating your page, you'll be directed to the settings menu. Here, you can customize general aspects of your page such as background images, colors, adding Facebook pixels, UTM parameters, page protection, and SEO settings.

Let's take a closer look at our options:
1. Preset Themes
The "Preset Themes" section allows you to choose from pre-designed themes for your bio page. These themes provide a starting point with a predefined set of colors, fonts, and layouts that can be applied instantly. Right now we just have one theme, but will add more in the future.
Note: If you have chosen a template, then do not select a theme as it will overwrite it. Templates and themes are different things. Please see Step 2 of this guide if you want to browse templates.
Options:
- Gradient Theme: This option provides a visually appealing gradient background for your bio page, which can enhance its aesthetic appeal and make it stand out.
- Custom: Selecting this allows you to start from scratch.
2. Customizations
The "Customizations" section offers a wide range of options to personalize the appearance of your bio page. This includes settings for background, font, block spacing, and hover animations.
Options:
- Background:
- Background Types: Choose from a variety of background styles such as simple gradients and images.
- Background Attachment: Decide if the background should scroll with the page or remain fixed in place.
- Background Blur and Brightness: Adjust the blur and brightness levels to enhance the visual appeal.
- Favicon: Upload a custom favicon to appear in the browser tab, reinforcing your brand identity.
- Font: Select from a variety of fonts to match your brand style or personal preference.
- Font Size: Specify the size of the text to ensure readability and aesthetic balance.
- Block Spacing: Modify the spacing between blocks to create a more organized and visually pleasing layout.
- Block Hover Animation: Choose the animation effect for when users hover over content blocks, adding a dynamic and engaging user experience.
Why It’s Useful: Customizations are crucial for creating a bio page that reflects your unique style or brand. By allowing you to adjust visual elements such as background, fonts, and layout, you can ensure that your bio page stands out and effectively communicates your brand's personality.
3. Verified Badge
The "Verified Badge" section allows you to request and manage the display of a verification badge on your bio page. This badge signals to users that your page is authentic and has been verified by the platform. Note: This feature is only available on our subscription plan.
Options:
- Location: Choose where the verified badge will be displayed on your bio page. Options include: None: No badge will be displayed. Top: The badge will appear at the top of your bio page. Bottom: The badge will appear at the bottom of your bio page.
Why It’s Useful: Having a verified badge on your bio page helps to build trust and credibility with your audience. It assures users that the page is genuine and associated with a legitimate person or organization. This can be particularly beneficial for public figures, brands, or anyone looking to establish a trusted presence online.
4. Branding
The branding section allows you to remove or customize the "Made with LinkPod" footer. This feature is available on our "Plus" plan.
Options:
- Display Branding: Toggle this option to show or hide branding elements on your bio page.
- Branding Name: Enter the name you want to display as your brand. Leaving this field empty will use the default site branding.
- Branding URL: Add a URL that links to your main website or another relevant page. This helps direct users to additional information or services.
- Text Color: Customize the color of the text to align with your brand’s color scheme, ensuring a consistent and professional look.
5. Pixels
Description: The "Pixels" section is where you can manage tracking pixels for your bio page. Pixels are small snippets of code that collect data about user interactions, helping you track and analyze the performance of your bio page.
Options:
- Pixels: This option allows you to view and manage existing tracking pixels.
- Create Pixel: Use this button to add new tracking pixels from various platforms such as Facebook, Google Analytics, and more.
Why It’s Useful: Integrating tracking pixels is crucial for gaining insights into how users interact with your bio page. This data helps you measure engagement, track conversions, and optimize your page for better performance. It’s particularly useful for understanding user behavior and refining your digital marketing strategies.
6. UTM Parameters
The "UTM Parameters" section allows you to add tracking tags to your links. UTM parameters are URL parameters used by marketers to track the effectiveness of online marketing campaigns across traffic sources and publishing mediums.
Options:
- Source: Enter the source of your traffic, such as a newsletter, search engine, or specific website (e.g., "newsletter," "google," "bing").
- Medium: Define the marketing medium through which your traffic comes, such as "email," "social," "banner," or other forms of outreach.
- Campaign: Identify the specific campaign related to the link, such as "spring_sale_2024" or "holiday_promo."
- UTM Preview: This shows how the UTM parameters will appear in your final URL, ensuring they are correctly formatted and providing a quick reference to see what data will be tracked.
Why It’s Useful: UTM parameters are essential for tracking the performance of your marketing campaigns. By tagging links with specific UTM parameters, you can analyze where your traffic is coming from and which campaigns are most effective, helping you refine your marketing strategies and improve ROI.
7. Protection
The "Protection" section provides options to secure your bio page by setting up access controls and warnings. This helps ensure that only authorized users can access your content, or that users are warned about potentially sensitive material.
Options:
- Password: You can require users to enter a password before they can access the link. This adds a layer of security, ensuring that only people with the password can view the page.
- Sensitive Content Warning: Enable this option to prompt users with a warning about sensitive content. Users must confirm they want to proceed, which helps in managing the expectations and preparedness of viewers.
Why It’s Useful: This section is crucial for protecting sensitive information or controlling access to specific content. Password protection ensures that only intended users can access the page, which is valuable for exclusive content or internal communications. The sensitive content warning helps to manage user experience by alerting them to potentially disturbing or explicit content before they view it.
8. SEO
The "SEO" section provides settings to optimize your bio page for search engines or manage its visibility. This helps improve the page's ranking in search results or control its indexing.
Options:
- Block Search Engine Indexing: Toggle this option to prevent search engines from indexing your bio page. This is useful for pages you don’t want to appear in search results, such as private or temporary content.
- Page Title: Set a custom title for your page, which will appear in search engine results and browser tabs. This title is crucial for conveying the content of your page and attracting clicks.
- Meta Description: Add a custom meta description that will be displayed in search engine results. This description helps improve your page's visibility and click-through rate by providing a concise summary of its content.
- Meta Keywords: Include relevant keywords to help search engines understand the content of your page, potentially improving its ranking for those terms.
- OpenGraph Image: Upload an image that will be displayed when your link is shared on social media platforms. This enhances the visual appeal of your shared links and can increase engagement.
Why It’s Useful: SEO settings are essential for improving the discoverability of your bio page in search engines, helping to drive organic traffic. By optimizing titles, descriptions, and keywords, you can better communicate the relevance of your content to both users and search engines. Blocking indexing is useful for keeping specific pages out of search results when needed.
9. Advanced
The "Advanced" section provides additional settings for organizing and managing your bio page, including project management, splash pages, and leap link URLs. These settings offer more control over the user experience and how your bio page integrates with broader marketing strategies.
Options:
- Project: This allows you to categorize your bio page under a specific project, which helps in organizing and managing multiple bio pages more effectively. You can create a new project or select an existing one.
- Splash Page: Set up a splash page that users will see before they are redirected to the main content. Splash pages are often used to display important messages, advertisements, or terms of use.
- Leap Link URL: Specify a URL that will fully redirect users away from your bio page to this new destination. This is useful for temporary redirects or if you want all traffic to go to a different URL.
Why It’s Useful: Advanced settings are crucial for maintaining a structured and professional approach to managing your bio pages. By using projects, you can keep your pages organized and track their performance within specific contexts. Splash pages provide an opportunity to communicate key information before users access the main content, and leap link URLs offer flexibility in redirecting traffic when needed.
Step 4: Editing Content with Blocks
After configuring your bio page settings in LinkPod, the next step is to use the Blocks Editor. This tool allows you to add and edit content blocks that form the main content of your bio page. Here's a comprehensive guide to the Blocks Editor interface based on the provided image.
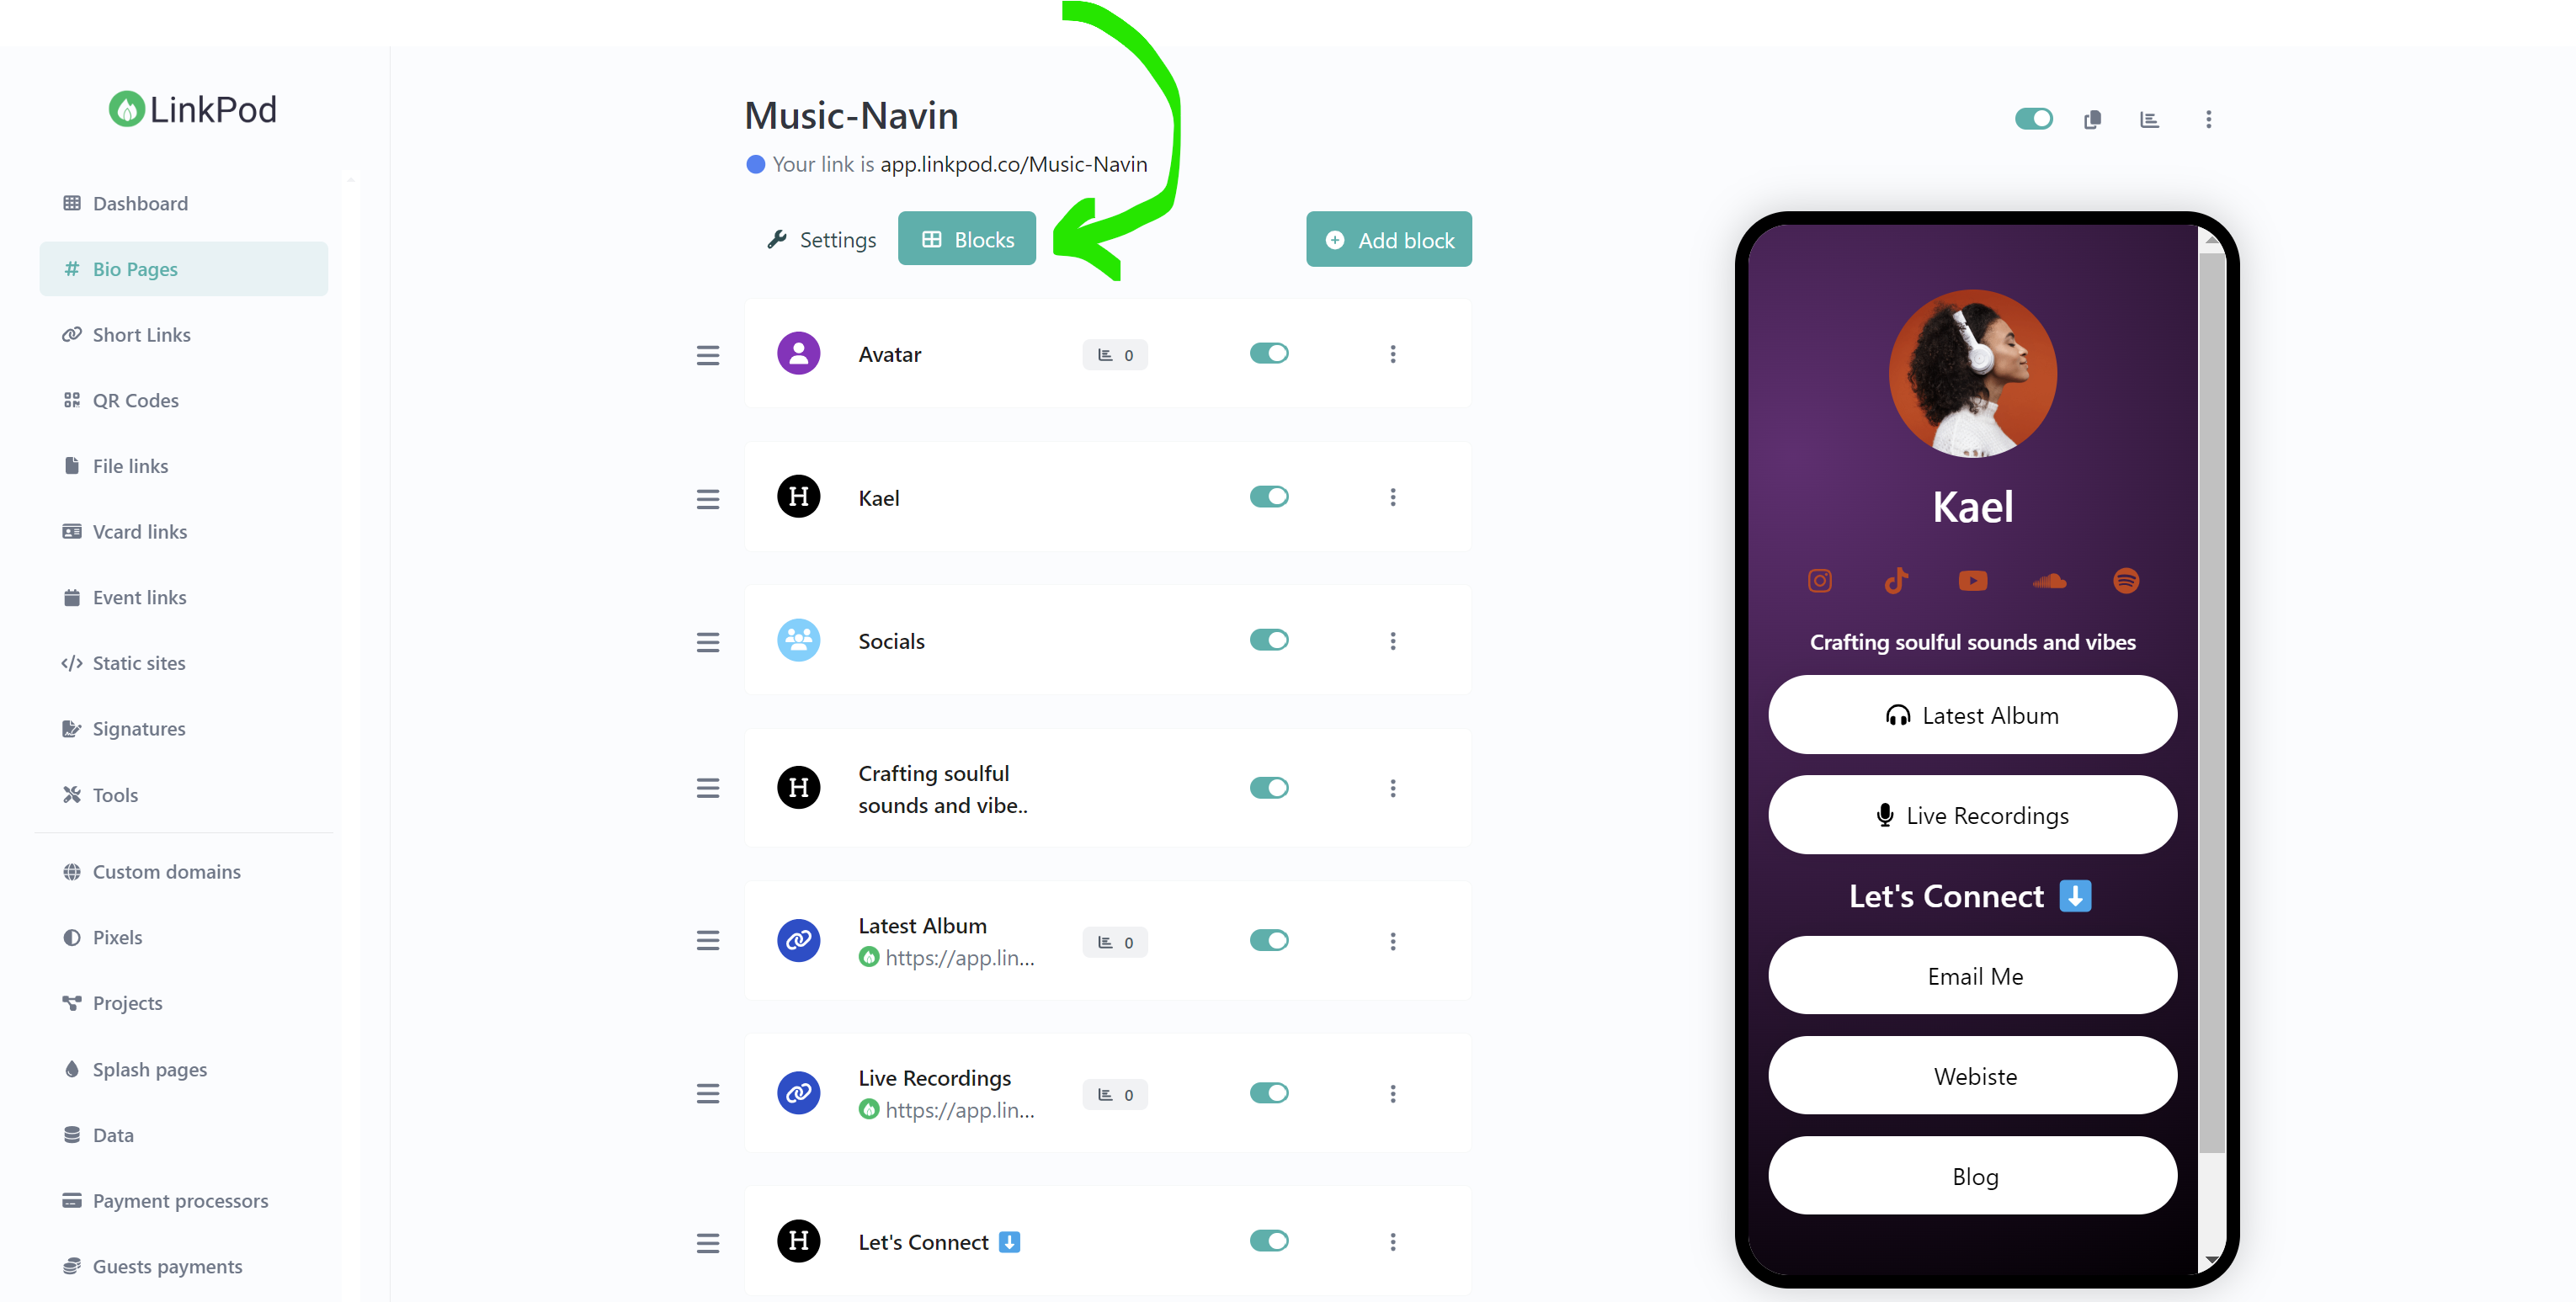
To access the blocks editor, click on the "Blocks" button, which is next to the "Settings" button at the top of the bio page editor.

1. Block Interface Overview
Page Preview Panel (Right Side):
- Live Preview: The right side of the interface displays a live preview of your bio page. This is where you can see changes in real-time as you add or modify blocks.
Blocks List Panel (Center):
- Blocks List: The central part of the interface lists all the blocks currently added to your bio page. Each block represents a distinct section or piece of content.
- Reorder Blocks: You can drag and drop blocks within this list to reorder them, changing the layout and flow of your bio page.

Editor Controls (Top Center):
- Settings: Click the "Settings" button to return to the settings configuration for your bio page, where you can adjust overall settings like themes and branding.
- Blocks: The "Blocks" button takes you to the blocks editor mode, where you can focus on adding and customizing content blocks.
- Add Block: Use the "Add Block" button to insert new content blocks into your bio page. A dropdown will appear with different block types you can choose from.
Block Management Controls:
- Block Visibility: Each block in the list has a toggle switch to enable or disable it. This is useful for temporarily hiding sections without deleting them.
- On/Off Toggle: Use the toggle switch to quickly enable or disable a block's visibility on your bio page.
- Edit Options: Click the three-dot menu next to each block for more options like editing content, duplicating, or deleting the block.
- Edit Block: Opens the block editor where you can customize the content and settings for that specific block. Quick Tip: You can also just click on the block itself to edit it.
- Duplicate Block: Creates a copy of the block, allowing you to reuse content with minor adjustments.
- Delete Block: Removes the block from your bio page entirely.
2. Adding New Blocks
You can add new blocks by clicking on "Add Block" button, and choose from a variety of options, including integrations with popular social channels.

Below is a guided list of the available blocks, categorized by their function and purpose.
Standard Blocks
These are the basic blocks that cover general content needs, suitable for creating a variety of straightforward elements on your page.
- Link: Add a hyperlink to another page or an external website.
- Paragraph: Insert a block of text for descriptions, stories, or information.
- Image: Upload and display a single image to visually enhance your page.
- Image Grid: Showcase multiple images in a grid layout.
- List: Create a bulleted or numbered list for structured information.
- Audio: Embed an audio file for visitors to listen to directly on your page.
- File: Upload and link to downloadable files such as PDFs or documents.
- PDF Document: Embed a PDF document that users can view directly on your page.
- Heading: Insert headers to organize content and make it easier to read.
- Avatar: Display a profile picture or any image in a circular format.
- Socials: Add links to your social media profiles.
- Divider: Insert a horizontal line to separate sections of your content.
- Big Link: Create a large, attention-grabbing link for important content.
- Video: Embed a video for users to watch on your page.
- Call to Action: Add a button that prompts users to take a specific action, such as signing up or visiting a link.
Advanced Blocks
These blocks provide more complex functionality and are designed to help you achieve specific objectives or add dynamic content.
- Email Collector: Add a form to collect email addresses from visitors.
- Phone Collector: Include a form for collecting phone numbers.
- Contact Form: Create a form for users to contact you directly.
- Custom HTML: Insert custom HTML code for advanced customizations.
- RSS Feed: Display a feed of the latest updates from a website.
- VCard: Provide a downloadable digital business card.
- Alert: Show a notification or alert message to visitors.
- FAQ: Create a list of frequently asked questions.
- Countdown: Add a countdown timer for events or promotions.
- External Item: Link to external items or resources.
- Share: Include buttons for sharing your page on social media.
- Timeline: Display content in a chronological order.
- Youtube Feed: Embed a feed of videos from a YouTube channel.
- Image Slider: Create a slideshow of images.
- Review: Add a section for customer reviews or testimonials.
- Markdown: Insert text with Markdown formatting for styling.
Payments
These blocks are focused on facilitating transactions and managing payments, useful for e-commerce or fundraising.
- PayPal: Add a PayPal button for donations or payments.
- Donation: Include a block for visitors to make donations.
- Product: Display a product listing with purchasing options.
- Service: Add a block to describe and sell a service.
Embeds
These blocks allow you to integrate content from various external platforms, enriching your page with multimedia and social media content.
- Threads: Embed posts or discussions from Threads.
- SoundCloud: Include a SoundCloud audio player.
- Spotify: Add a Spotify playlist or track player.
- YouTube: Embed YouTube videos.
- Twitch: Add a Twitch video player or stream.
- Vimeo: Include Vimeo videos.
- TikTok Video: Embed a TikTok video.
- Apple Music: Add Apple Music content.
- Tidal: Embed a Tidal music player.
- Anchor FM: Include an Anchor FM podcast player.
- Twitter Profile: Embed a Twitter profile.
- Twitter Tweet: Add individual tweets.
- Pinterest Profile: Display a Pinterest profile.
- Instagram Media: Embed Instagram posts.
- TikTok Profile: Add a link to a TikTok profile.
- Typeform: Include a Typeform survey or form.
- Discord Server: Link to a Discord server.
- Facebook Post: Embed Facebook posts.
- Reddit Post: Display Reddit posts.
- Rumble Video: Embed videos from Rumble.
3. Editing Your Blocks
Customize each block to fit your needs, whether by setting padding, changing images, or other options.
Select a block to edit:
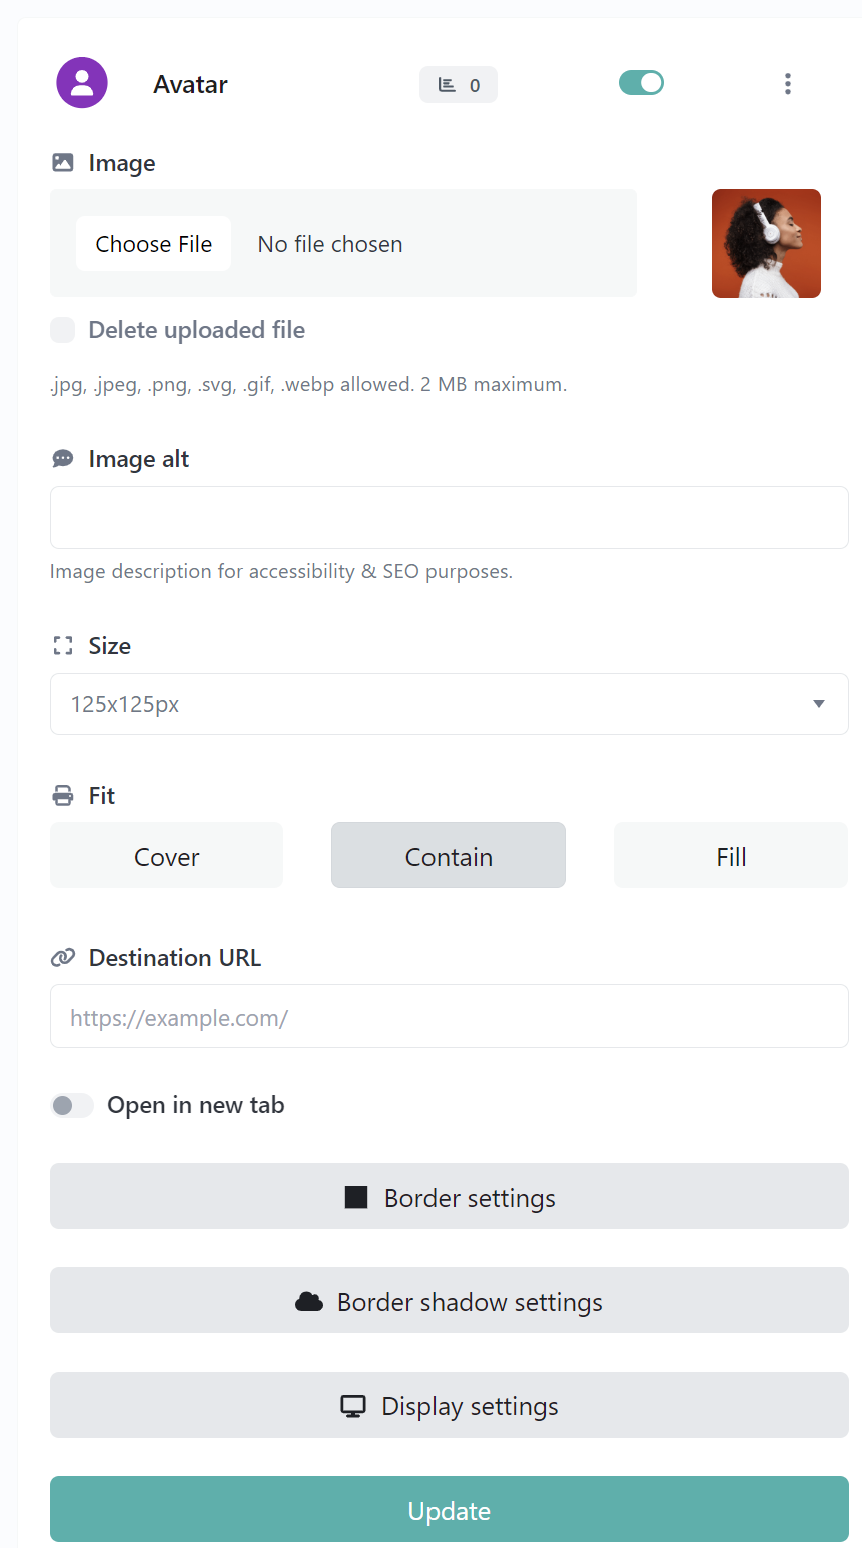
- In the blocks list, click on the block you want to edit. For example, clicking on the "Avatar" block will open its detailed settings for editing.

Edit your blocks:
The Block Editor interface in LinkPod provides a user-friendly environment for customizing each block on your bio page. While different blocks may offer specific options tailored to their type, the general editing features are consistent across all blocks.
You can upload images, specify alt text for accessibility, and set dimensions to control the display size. The editor allows you to adjust various style elements such as fonts, padding, and borders, giving you flexibility in how content is presented.
You can add links to each block and choose whether they open in a new tab, ensuring seamless navigation for users. Additionally, you can apply custom borders and shadows, modify block spacing, and set visibility options to tailor the appearance and functionality of your page.
Overall, the Block Editor combines intuitive controls with comprehensive customization options, enabling you to create a professional and engaging bio page.
Conclusion
Creating a link in bio page with LinkPod is designed to be straightforward and user-friendly, allowing for both complexity and simplicity based on your needs. Whether you start from scratch or use a template, the process is quick to learn and offers extensive customization options to make your page truly your own.
LinkPod is built for ease of use, ensuring you can efficiently create a page that meets your digital marketing or personal branding requirements. If you have any questions or need further assistance, the LinkPod team is ready to help you get the most out of your link in bio page.
Happy creating, and remember, with LinkPod, every link is an opportunity to enhance your online engagement. Have a great day!